Install swift on macOS
Note
use the dedicated 64bit macOS version of swift only
Warning
Close your flight simulator and all running swift applications before starting the installation
Run the swift installer and follow the steps as shown.
-
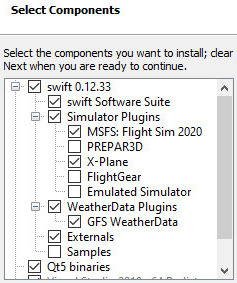
components choice: normally you don't need to do anything here, just check if your flight simulator platform is listed and selected and then proceed to the next step in the installation process.

Warning
It is advisable to not de-select any of the components, or swift will not run properly. The installer will list all flight simulator platforms that it is compatible with. If you wish, you can de-select the ones that you definitely will not be needing. E.g. if you're only going to use X-Plane, remove the check marks from all other simulators.
-
swift* pilot client path: you may select a custom drive and path where you would like to install swift pilot client, it can be place anywhere you like.

Warning
Do not use a generic name for the actual program path, but rather use the path name that the installer suggests (swift vs. swift-0.9.5-64bit).
With new versions being released every now and then, it will be much easier to do your house keeping by keeping them separate.
-
Use existing configuration: At the end of each program installation, swift checks your system for previous installations of the client. Should it find one, the installer will offer you to copy those swift-settings to the new version:

Select "Yes" to copy your settings, as this will save you from configuring swift again. If you are just updating swift and you are using X-Plane, then you will have to update xswiftbus (run the Config Wizard).
However, if you did not get this message, you will have to configure swift before you can use it.
By now, swift should have started its swiftLauncher app. Before you use it, jump to the chapter where we discuss the configuration for each type of flight simulator platform that we support. You can use the directory on the left side or the hyper-links below:
Should you encounter any problems then see our troubleshooting pages.